Have you ever seen a number inside a tool and still had no idea what it actually meant?
A score from 0 to 100, by itself, explains nothing.
It can impress you.
It can disappoint you.
But if you do not know what is behind it, it is just decoration.
That is why the Build Oracle Score was never meant to be a mystery number.
If Path of Codex is going to score your build, it should also explain why.
So here is exactly how the Build Oracle Score works — and how it connects to the rest of the Path of Codex system.
The Oracle does not give you a grade. It reads four pillars.
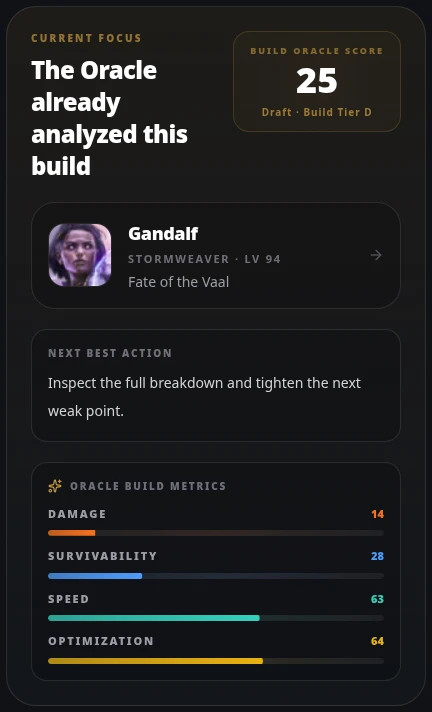
Each pillar measures a different dimension of your build, and each has a different weight in the final result — because in Path of Exile 2, not all strengths carry the same value.
A build with damage but no survival is fragile.
A build with defenses but no kill pressure stalls out.
A build with good stats but critical structural mistakes should not receive a flattering score.
The Oracle tries to reflect that reality.
And while the score summarizes your build, the full interpretation of it is handled by the Oracle Verdict, which explains what those numbers actually mean in practice.
Survivability — 35% of the score
This is the heaviest pillar, and that is intentional.
In PoE2, surviving often matters more than looking strong on paper.
Dying is not a small inconvenience. It costs momentum, consistency, and progression itself.
The Oracle reads the defensive foundation of your character through multiple layers:
- Total Life and Energy Shield
- Defensive layers — armour, evasion, block, and physical damage reduction
- Recovery — life regeneration, leech, and Energy Shield recharge
- Simulated EHP
Each value is compared against endgame-oriented benchmarks.
As a broad reference for endgame mapping:
- 6,000 Life represents a mature defensive baseline
- 50,000 simulated EHP represents the upper end expected from serious defensive setups
Your character is positioned within those ranges.
In many cases, weaknesses in this pillar can be traced back to inefficient decisions in your Passive Tree, which is why understanding your build structure matters as much as your raw stats.
Damage — 30% of the score
Damage is not just one number, so the Oracle does not treat it like one.
Instead of reading only total DPS, it evaluates the damage profile of your main skill across five vectors:
- Hit — direct strike damage per cast or attack
- Burst — peak damage output in a short window
- DoT — damage over time pressure sustained on a target
- Ramp — how long the skill takes to reach full damage output
- Clear — effectiveness against multiple targets
This allows the system to understand how your build deals damage — not just how much.
A build that excels at boss burst may feel completely different from one optimized for map clear speed, even if their total DPS looks similar on the surface. This distinction becomes especially important when comparing builds side by side using Build Compare, where different damage profiles can lead to very different outcomes depending on your goal.
Optimization — 20% of the score
This is the most unforgiving pillar.
Optimization acts as a penalty system that removes points when structural problems are detected. The severity of each penalty reflects how much a given issue actually limits your character in practice:
Critical issue: −20 points
Uncapped resistances, no recovery, low hit chanceWarning: −8 points
Missing defensive layers, inefficient setups
This prevents the score from becoming misleading. A build that looks strong on the surface but carries hidden problems will see that reflected here — and those same issues will also be surfaced clearly inside the Oracle Verdict.
Speed — 15% of the score
Speed evaluates movement speed, attack speed, and cast speed.
It has lower weight, but still influences how your build feels in practice — especially for farming and mapping. Fast builds often feel smoother, safer, and more efficient over long play sessions, even when their raw damage is lower.
The tiers
| Tier | Score | What it means |
|---|---|---|
| S | 85–100 | Solid endgame build with very few open issues |
| A | 70–84 | Strong overall build with manageable concerns |
| B | 55–69 | Functional build with clear room for improvement |
| C | 35–54 | Noticeable weaknesses detected |
| D | 0–34 | Serious structural problems |
The tier helps translate the number into something easier to read at a glance. But the real value comes from understanding why your build sits in that tier — something the Oracle explains through its deeper analysis systems.
The score only appears when it makes sense
Below level 50, no score is shown. At that stage, your character does not yet represent a complete build.
If data is incomplete, the score is marked as partial, with low confidence.
The Oracle would rather be honest than precise.
What the score is not
It is not a universal ranking.
It is not a guarantee of success.
It is not invented.
It is a contextual reading of your build, at this exact moment. And when that moment changes — after an item swap, a respec, or a progression step — the system updates, and the change is surfaced through the Notification Center and recorded over time in your Timeline.
Why this matters
The Build Oracle Score is not meant to replace analysis. It is meant to guide you toward it.
It tells you where you stand — but more importantly, it points you toward what needs attention. The number is only the beginning. The explanation lives in the Verdict that interprets it, the Journal that tracks it, the Timeline that records it, and the notifications that surface changes when they matter.
This article is part of the Path of Codex Season 0.5 update.